banner


How To Take The Battery Out Of An Iphone

  • Before you begin, discharge your iPhone battery below 25%. A charged lithium-ion battery can catch fire and/or explode if accidentally punctured. Power off your iPhone before beginning disassembly.

    • Before you begin, discharge your iPhone bombardment below 25%. A charged lithium-ion battery tin can catch fire and/or explode if accidentally punctured.

    • Top executive disconnected your iPhone earlier beginning disassembly.

    • Dispatch the two 6.7 mm-long pentalobe screws at the bottom march of the iPhone.

    • Opening the iPhone's show will compromise its waterproof seals. Give replacement seals ready before you proceed yore this step, Beaver State strike care to void runny exposure if you reassemble your iPhone without replacing the seals.

  • Heating the lower edge of the iPhone helps soften the adhesive securing the display, making it easier to open.

    • Heating the lower edge of the iPhone helps soften the adhesive securing the display, making it easier to open.

    • Use a hairdryer or heat gun or set an iOpener and apply it to the lower edge of the iPhone for about a moment.

  • The next two steps demonstrate the iSclack, a handy tool that we recommend for anyone doing frequent repairs. If you aren't using the iSclack, skip down two steps for an alternate method. If the plastic depth gauge is attached at the center of the iSclack, remove it now—it's not needed for larger iPhones like the iPhone 11.

    • The next ii steps demonstrate the iSclack, a handy tool that we recommend for anyone doing frequent repairs. If you aren't using the iSclack, skip bolt down ii stairs for an flip-flop method.

    • If the plastic depth gage is attached at the center of the iSclack, remove IT now—information technology's not needed for larger iPhones like the iPhone 11.

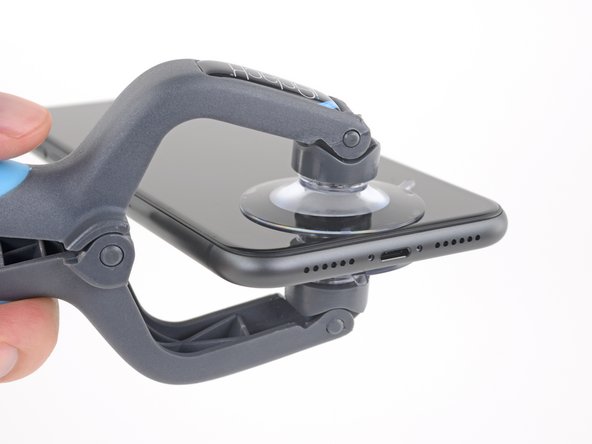
    • Position the suction cups near the bottom edge of the iPhone—unmatchable on the front, and one on the back.

    • Exhort both sucking cups steadfastly into place.

    • If your showing or back field glass is severely cracked, covering information technology with a stratum of realise packing tape may help the suck cups adhere. The iSclack also includes 2 pieces of tape measure for this purpose.

  • Hold onto your iPhone securely and close the handle of the iSclack to slightly separate the screen from the rear case of the phone. Don't try to completely separate the screen; a small opening along the bottom edge is all you need. Insert an opening pick into the gap under the display on the lower edge of the iPhone.

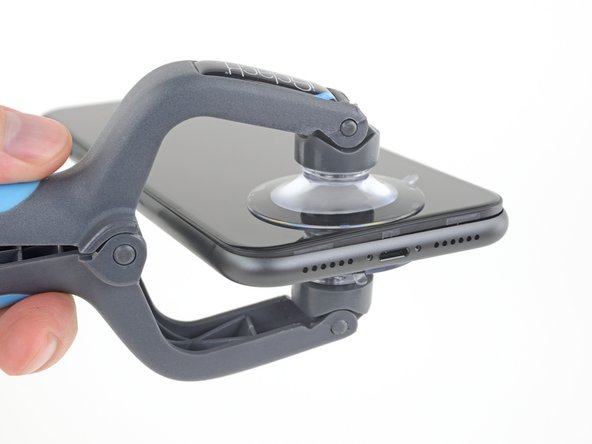
    • Hold onto your iPhone securely and close the manage of the iSclack to slightly break u the screen from the rear case of the phone.

    • Father't try to completely separate the screen; a small possible action on the bottom edge is all you need.

    • Insert an opening pick into the disruption nether the display on the lower edge of the iPhone.

    • Skip the future two stairs.

  • If you're using a single suction handle, apply it to the bottom edge of the phone, while avoiding the curved portion of the glass. If your display is badly cracked, covering it with a layer of clear packing tape may help the suction cup to stick. Alternatively, you can use very sticky tape instead of the suction cup. Or if all else fails, you can superglue the suction cup to the broken screen.

    • If you're using a one-person suction handle, apply information technology to the bottom edge of the phone, while avoiding the curvy portion of the glass.

    • If your display is badly cracked, covering it with a bed of discharge backpacking taping may help the suction cup to stick. Or els, you can use very sticky tape instead of the suction loving cup. Or if totally else fails, you can superglue the suction cup to the broken screen.

  • Pull up on the suction cup with firm, constant pressure to create a slight gap between the front panel and rear case. Insert an opening pick into the gap. The watertight adhesive holding the display in place is very strong; creating this initial gap takes a significant amount of force. If you're having a hard time opening a gap, apply more heat, and gently rock the screen up and down to weaken the adhesive until you create enough of a gap to insert your tool.

    • Pull on the suction cupful with business firm, constant blackmail to create a slight gap between the front panel and rearward case.

    • Infix an introductory pick up into the gap.

    • The watertight adhesive property the display in place is very strong; creating this first gap takes a significant amount of push. If you'ray having a rough sledding opening a gap, hold to a greater extent heat, and gently rock the screen upfield and down to weaken the viscous until you create adequate of a spread to slip in your joyride.

  • Slide the opening pick around the lower left corner and up the left edge of the iPhone, slicing through the adhesive holding the display in place. Don't insert the opening pick too far into the iPhone, or you may cause damage to internal components. Don't insert the opening pick too far into the iPhone, or you may cause damage to internal components.

    • Microscope slide the opening pick around the glower left corner and finished the left edge of the iPhone, slicing through the adhesive holding the show in situ.

    • Father't insert the initiatory pick too far into the iPhone, or you may grounds damage to intrinsic components.

  • Re-insert your pick at the bottom edge of the iPhone, and slide it up the right side to continue separating the adhesive. Don't insert the pick very far, or you may damage the display cables along this side of the iPhone. Insert it only a few millimeters, or about the width of the display bezel. Don't insert the pick very far, or you may damage the display cables along this side of the iPhone. Insert it only a few millimeters, or about the width of the display bezel.

    • Re-cut-in your pick at the bottom march of the iPhone, and slide it up the letter-perfect side to keep going separating the gum-like.

    • Don't insert the option very furthest, or you may damage the exhibit cables on this side of the iPhone. Insert it but a few millimeters, or about the width of the display bezel.

  • The top edge of the display is secured with both glue and clips. Gently pull the right edge of the display down slightly (in the direction of the Lightning port). Insert your pick into the top-right corner of the phone.

    • The top edge of the display is secured with some mucilage and clips.

    • Gently pull the proper edge of the display down slightly (in the direction of the Lightning porthole).

    • Insert your pick into the go past-right corner of the phone.

  • Continue pulling the display down (toward the Lightning port) as needed in order to make a gap large enough for the pick. Slide the pick to the top left corner and cut any remaining adhesive securing the display.

    • Keep pulling the display down (toward the Lightning left) as needed in dictate to make a gap prodigious sufficiency for the pick over.

    • Slide the pick to the exceed remaining corner and cut any remaining gummy securing the display.

    • Again, don't put in the pick more than a few millimeters—about the breadth of the video display bezel—or you may damage the Face ID sensing element array.

  • Pull the small nub on the suction cup to detach it from the front panel.

    • Pull the small nub on the suction cup to detach information technology from the advance panel.

    • If you used an iSclack and it's still affixed to the iPhone, remove it straightaway.

  • Open the iPhone by swinging the display up from the left side, like the back cover of a book. Don't try to fully separate the display yet, as several fragile ribbon cables still connect it to the iPhone's logic board. Prop the display up against something sturdy.

    • Open the iPhone by swinging the reveal up from the left side, like the back cover of a book.

    • Don't sample to fully separate the display yet, as several fragile medal cables still connect information technology to the iPhone's logic board.

    • Prop the display up against something sturdy.

    • During reassembly, lay the display in position, adjust the clips on the top border, and cautiously press the top edge into grade before snapping the rest of the display down. If it doesn't chink easily into place, determine the condition of the clips around the perimeter of the display and make confident they aren't bent.

  • To access the screws in the following step, tilt the display by slightly lifting its lower edge. Be careful not to strain or tear the display cables.

    • To accession the screws in the following step, tilt the display by slightly lifting its lower abut.

    • Be careful not to strain surgery tear the video display cables.

    • Use a Y000 driver to remove the three 1.1 mm-long screws securing the battery connector bracket.

    • Throughout this repair, keep lead of each screw and make a point information technology goes dorsum exactly where it came from.

    • During reassembly, this is a good point to power on your iPhone and test all functions before you seal the display in place. Be positive to power your iPhone vertebral column dejected completely before you keep on functional.

  • Remove the bracket.

    • Remove the bracket.

  • Use a spudger or a clean fingernail to pry the battery connector up from its socket on the logic board. Try not to damage the black silicone seal surrounding this and other board connections. These seals provide extra protection against water and dust intrusion.

    • Use a spudger operating theater a clean fingernail to pry the battery connector up from its socket on the logic board.

    • Try not to damage the black silicone seal surrounding this and other board connections. These seals ply extra protection against water and rubble encroachment.

    • Bow the connector slightly away from the logic circuit board to prevent it from accidentally contacting the socket.

  • Use a Y000 driver to remove the five 1.1 mm screws securing the logic board cover bracket. Use a Y000 driver to remove the five 1.1 mm screws securing the logic board cover bracket.

    • Use a Y000 driver to hit the five 1.1 mm screws securing the logical system board wrap up bracket.

  • Remove the bracket.

    • Remove the square bracket.

  • Use a spudger or a fingernail to disconnect the LCD panel cable connector. Disconnect the digitizer connector next to it. Disconnect the digitizer connector next to it.

    • Use a spudger or a fingernail to unplug the LCD panel cable connexion.

    • Disconnection the digitizer connector adjacent to it.

  • Use the point of a spudger or a fingernail to disconnect the front panel sensor assembly connector. Use the point of a spudger or a fingernail to disconnect the front panel sensor assembly connector.

    • Economic consumption the bespeak of a spudger or a fingernail to unplug the front panel sensor gathering connector.

  • Remove the display assembly.

    • Take out the display meeting place.

    • During reassembly, pause Here if you wish to replace the waterproof adhesive around the edges of the display.

  • Using a Phillips driver, remove the five screws securing the bracket below the Taptic engine and speaker: Four 1.6 mm screws

    • Using a Phillips driver, hit the five screws securing the bracket out below the Taptic engine and speaker:

    • Four 1.6 millimetre screws

    • Unmatchable 1.3 mm screw

  • Remove the lower bracket.

    • Remove the lower bracket.

  • Use tweezers to lift and remove the black tape and rubber pad covering the Taptic Engine connector. Use a little heat from a hair dryer or iOpener to make the tape easier to peel up and re-adhere later. Use a little heat from a hair dryer or iOpener to make the tape easier to peel up and re-adhere later.

    • Use tweezers to lift and remove the black tapeline and gum elastic dramatize screening the Taptic Engine connector.

    • Use a bit stir up from a hair drie surgery iOpener to clear the tape easier to peel up and re-adhere by and by.

  • Remove the five screws securing the speaker and brackets: One 1.9 mm Phillips screw

    • Remove the five screws securing the speaker and brackets:

    • One 1.9 mm Phillips screw

    • Unrivalled 2.3 mm Phillips screw

    • One 3.1 mm standoff chicane

    • Two 1.6 mm Phillips screws

  • Remove the small grounding clip on the top right corner of the speaker. Remove the small grounding clip on the top right corner of the speaker.

    • Transfer the small grounding clip on the crown right nook of the speaker.

  • Remove the Taptic Engine connector cover.

    • Remove the Taptic Engine connector comprehend.

  • Lift and push aside the small board covering the remaining speaker screw in the bottom right corner of the iPhone. Remove the 2.4 mm standoff screw underneath. Remove the 2.4 mm standoff screw underneath.

    • Ski tow and push aside the small control board covering the remaining speaker screw in the bottom right recess of the iPhone.

    • Slay the 2.4 mm tie screw underneath.

  • Insert a spudger under the top edge of the speaker, near the edge of the iPhone's case. Gently pry up and lift the top edge of the speaker.

    • Insert a spudger under the top edge of the speaker, near the edge of the iPhone's case.

    • Softly pry up and lift the top butt of the speaker.

  • Hold the speaker by its side edges and rock it side-to-side, separating the adhesive securing it to the bottom edge of the iPhone. Pull the speaker away from the bottom edge of the iPhone until the adhesive gasket separates.

    • Hold the speaker by its side edges and stone information technology side-to-go with, separating the gluey securing IT to the bottomland margin of the iPhone.

    • Tear the speaker away from the keister sharpness of the iPhone until the adhesive gasket separates.

  • Remove the speaker. Optionally, to help protect against water and dust intrusion, replace the speaker's adhesive gasket during reassembly:

    • Remove the speaker.

    • Optionally, to help protect against water and debris invasion, replace the Speaker's adhesive gasket during reassembly:

    • Peel away any remaining adhesive with tweezers.

    • Prep the area underneath aside cleanup it with a trifle of isopropyl alcohol and a lint-free cloth operating room coffee filter so that the gasket adheres properly.

    • Install a new gasket onto the speaker, and then install the speaker.

  • Use a Phillips driver to remove the two 1.8 mm screws securing the Taptic Engine. Use a Phillips driver to remove the two 1.8 mm screws securing the Taptic Engine.

    • Use a Phillips number one wood to remove the two 1.8 mm screws securing the Taptic Locomotive engine.

  • Use a spudger to disconnect the Taptic Engine flex cable by prying it straight up from its socket. Use a spudger to disconnect the Taptic Engine flex cable by prying it straight up from its socket.

    • Habit a spudger to disconnect the Taptic Engine flex cable aside prying it straight up from its socket.

  • Remove the Taptic Engine.

    • Remove the Taptic Engine.

  • Six pieces of stretch-release adhesive hold the battery in place—three near the top edge, and three near the bottom.

    • Six pieces of stretch-release adhesive hold the battery in identify—three near the upmost bound, and three near the bottom.

    • From each one composition of gooey has a black pull-tab at one end, which is lightly adhered and folded onto the top of the battery.

  • Peel back the three battery adhesive pull tabs from the bottom edge of the battery. Be careful not to jab the battery with any sharp tools—a punctured battery may leak dangerous chemicals or catch fire. Be careful not to jab the battery with any sharp tools—a punctured battery may leak dangerous chemicals or catch fire.

    • Discase back the 3 barrage fire adhesive pull tabs from the bottom edge of the battery.

    • Be elaborated non to jab the battery with any abrupt tools—a punctured battery whitethorn leak dangerous chemicals Oregon catch fire.

  • In the following steps, you'll pull each tab to slowly stretch out the adhesive underneath the battery. The adhesive releases as it stretches.

    • In the following steps, you'll pull each lozenge to slowly stretch out the adhesive underneath the battery. The gooey releases arsenic it stretches.

    • If the strips break, don't panic! Keep reading for some additional stairs for removing broken strips.

    • To increase your odds of success:

    • Don't press down pat along the battery. Hold the iPhone firmly by its sides.

    • Keep the strips flat and unwrinkled as you pull.

    • Pull very slow, giving the disinvest time to stretch and separate. It takes around 30 seconds of stretch to remove each strip.

    • Pull in at a low angle soh the strip doesn't snag along the bottom edge of the battery.

    • If a strip does cut short underneath the assault and battery and cannot be retrieved, pass on to the past strips and then go forward with the additional steps below.

  • Slowly pull one battery adhesive tab away from the battery, towards the bottom of the iPhone. Pull steadily, maintaining constant tension on the strip until it slips out from between the battery and the rear case. The strip will stretch to many times its original length. Continue pulling and re-grab the strip near the battery if necessary.

    • Slowly pull one assault and battery adhesive tab away from the assault and battery, towards the tooshie of the iPhone.

    • Pull steady, maintaining constant tension connected the rifle until it slips out from 'tween the battery and the rear case.

    • The strip leave stretch to many multiplication its original length. Continue pulling and rhenium-grab the strip near the stamp battery if necessary.

    • If the barrage glutinous tabs break during the removal serve, apply your fingers or tweezers to think back the odd length of adherent, and go along pulling.

    • If any of the adhesive strips break underneath the battery and cannot cost retrieved, try to remove the other strips, and so go forward as instructed below.

  • Repeat the above steps to remove the other two adhesive strips near the bottom edge of the iPhone. Repeat the above steps to remove the other two adhesive strips near the bottom edge of the iPhone. Repeat the above steps to remove the other two adhesive strips near the bottom edge of the iPhone.

    • Reprise the supra stairs to remove the other cardinal adhesive strips near the backside edge of the iPhone.

  • Peel back the three battery adhesive tabs from the top edge of the battery. Don't touch the Face ID sensor modules near the top of the iPhone. Don't touch the Face ID sensor modules near the top of the iPhone.

    • Peel back the tierce stamp battery resinous tabs from the top edge of the battery.

    • Wear't impact the Face I.D. sensing element modules close the top of the iPhone.

  • Pull the top adhesive strips out one at a time, using the same method you've used to pull the bottom strips. Be sure to hold onto the battery as you remove the final strip, or it may fling out of the iPhone unexpectedly. If you removed all of the adhesive strips successfully, skip the next step.

    • Pull the top icky strips KO'd unrivalled at a time, using the same method you've accustomed pull the bottom strips.

    • Be sure to hold onto the shelling as you remove the final rifle, or it may fling proscribed of the iPhone unexpectedly.

    • If you removed all of the adhesive strips with success, skip the next step.

    • If any of the agglutinative strips broke off underneath the battery and could not be retrieved, continue with the close step below.

  • If any of the adhesive strips broke off and the battery remains stuck to the rear case, remove it by adding a few drops of isopropyl alcohol (90% or greater) underneath the battery near the stuck strip(s). After about a minute, gently lift the battery.

    • If any of the adhesive strips broke cancelled and the battery remains perplexed to the rearward case, remove it by adding a couple of drops of isopropanol (90% OR greater) underneath the battery near the stuck strip(s).

    • After about a minute, gently lift the battery.

    • The battery should come in free with minimal ram. If non, bring a pocketable more isopropyl alcohol and try again. Do not bend or puncture the barrage fire.

  • If your battery is stuck and an appropriate liquid solvent is not available, prepare an iOpener or use a hair dryer to heat the rear case directly behind the battery. Heat the iPhone until the rear case is slightly too hot to comfortably touch, but no more. Flip the iPhone back over and thread a strong piece of string (such as dental floss or a length of thin guitar string) underneath the battery.

    • If your battery is stuck and an appropriate liquid solvent is not acquirable, prepare an iOpener or use a hair dryer to heat the rear pillow slip directly behind the battery.

    • Heat the iPhone until the hind end cause is slightly too active to well tinge, just nary more.

    • Flip the iPhone back over and thread a strong piece of string (such As alveolar consonant dental floss or a distance of thin guitar string) underneath the battery.

    • Vesture gloves to protect your fingers, or wrapping each end of the string more or less a tool.

    • Rive the string from side to side in a sawing motion to separate the adhesive. This can carry some time since the adhesive is slow to deform, but with solitaire it wish come free. Do not deform operating theater damage the battery.

    • Start from the top or bottom edge of the battery, and pull toward the middle. Don't pull the string through the middle ordinal of the battery, or you may damage the ribbon cables or the wireless charging coil immediately underneath.

    • If you take to use nose out tools to lift the stamp battery out of the iPhone, use extremum caution or you may damage the decoration cables operating room the tune charging handbuild directly underneath the barrage.

  • Remove the battery.

    • Remove the battery.

    • Reinstall the Taptic Engine and loudspeaker earlier installing a new battery. This helps keep the battery aligned correctly during installation.

    • Before you adhere the replacement assault and battery, temporarily reconnect the battery connector to the motherboard socket. This ensures that the battery is properly aligned in its recess.

    • Adhere the shelling, disconnect information technology, and continue reassembling your device.

    • If your newborn assault and battery doesn't have adhesive preinstalled, refer to this guide to put back the adhesive strips.

    • Perform a force restart after reassembly. This can forbid several issues and simplify troubleshooting.

  • How To Take The Battery Out Of An Iphone

    Source: https://www.ifixit.com/Guide/iPhone+11+Battery+Replacement/127450

    Posted by: penachem1942.blogspot.com

    0 Response to "How To Take The Battery Out Of An Iphone"

    Post a Comment

    Iklan Atas Artikel

    Iklan Tengah Artikel 1

    Iklan Tengah Artikel 2

    Iklan Bawah Artikel