

Windows does not connect to WiFi on startup
One time you lot configure a WiFi connection on your Windows 11/10 laptop or a desktop with a WiFi adapter, information technology is expected that it will automatically connect the next time. Even so, if you are noticing that Windows 11/ten does not connect to WiFi on startup, and you need to connect manually, and so here is how to brand it automatically connect.

Windows 11/10 does not connect to WiFi on startup
There tin be multiple reasons for this behavior. So unless you lot have inverse the WiFi connection credentials recently, here is how you can brand Windows xi/x connect to WiFi automatically:
- Opt-in for Auto connection
- Disable Power Saver option on Wifi Adapter
- Adjust Wifi Adapter power management settings
- Delete Wlansvc Files.
Brand sure that the WiFi force is plenty for the laptop to notice and connect. If you have a weak signal, then you may need to get closer to the router.
1] Opt-in for Car connection

When you connect to a WiFi connection, there is a checkbox available. When you select it, it will make sure to automatically connect to the wifi connection next time it finds it. Y'all may have forgotten to check the selection.
- Click on the Wifi Connection or Internet connection icon in the system tray.
- Information technology will open the list of networks. Connect to the 1 you want, and so select information technology.
- Click on the Properties link to open up Network Properties
- In the network contour screen, toggle the choice which says the Connect automatically when in range.
Next time yous start your computer, and it will automatically connect.
2] Disable Power Saver pick on Wifi Adapter

When using a laptop, Battery Power Saver choice on Wifi Adapter can turn off Wifi when not in apply or sleep mode. Here is how to modify it
- Double click on Battery Icon in System tray. Then click on the Bombardment Settings link.
- It volition open up the Battery section. Side by side click on Ability and sleep settings
- In the Power and sleep settings, locate Additional power settings link in the right office. Click to open Power Options.
- Then for any selected plan, click on Modify plan settings > Change avant-garde Power settings. Click to open.
- In the Power Options Advanced settings window, find Wireless Adapter settings
- Expand, and yous will have options; On Battery and Plugged in.
- The default is Medium Power Saving. Y'all can change it to Maximum Functioning or Low Power Saving. The same, you lot can apply it for Plugged in the state.
Done that, the Wifi should automatically connect to the existing network.
3] Conform Wifi Adapter ability management settings

- Use WIN + X + M to open the Device Manager
- Expand the Network adapters list, and right-click on your installed network adapter and select Backdrop.
- Under Power management, uncheck the box which says allow the computer to turn off this device to save power.
If at all, the reason is power management, so information technology will make sure that the OS doesn't stop any Wifi connection. However, information technology usually happens when in low battery.
4] Delete Wlansvc Files
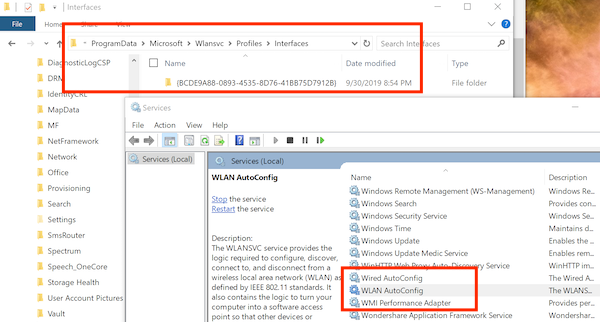
WLANSVC or WLAN Auto Config Service helps computers to discover a wireless network, and connect to it. If the files where information technology stores existing networks are corrupt, then it can exist a problem. Here is how yous tin refresh it:
- Blazon services.msc in the Run prompt and striking Enter.
- In the Services snap-in, locate WLAN AutoConfig.
- Right-click, and click on cease to stop the service.
- Using File Explorer navigate to C:\ProgramData\Microsoft\Wlansvc\Profiles\Interfaces
- Delete all the folders inside it.
- Restart the WLAN AutoConfig service, and then reconnect to networks again.
There are a few additional tips I would propose. You can try to update or reinstall network drivers, run Windows Network Troubleshooter, or remove and add adapter once more through the device managing director.
We hope these tips were useful, and you were able to understand them clearly.


Source: https://www.thewindowsclub.com/windows-10-does-not-connect-to-wifi-on-startup
Posted by: penachem1942.blogspot.com
0 Response to "Windows does not connect to WiFi on startup"
Post a Comment